keycloak với spring boot
Tung Bui Thanh (TungDaDev)14 mins read
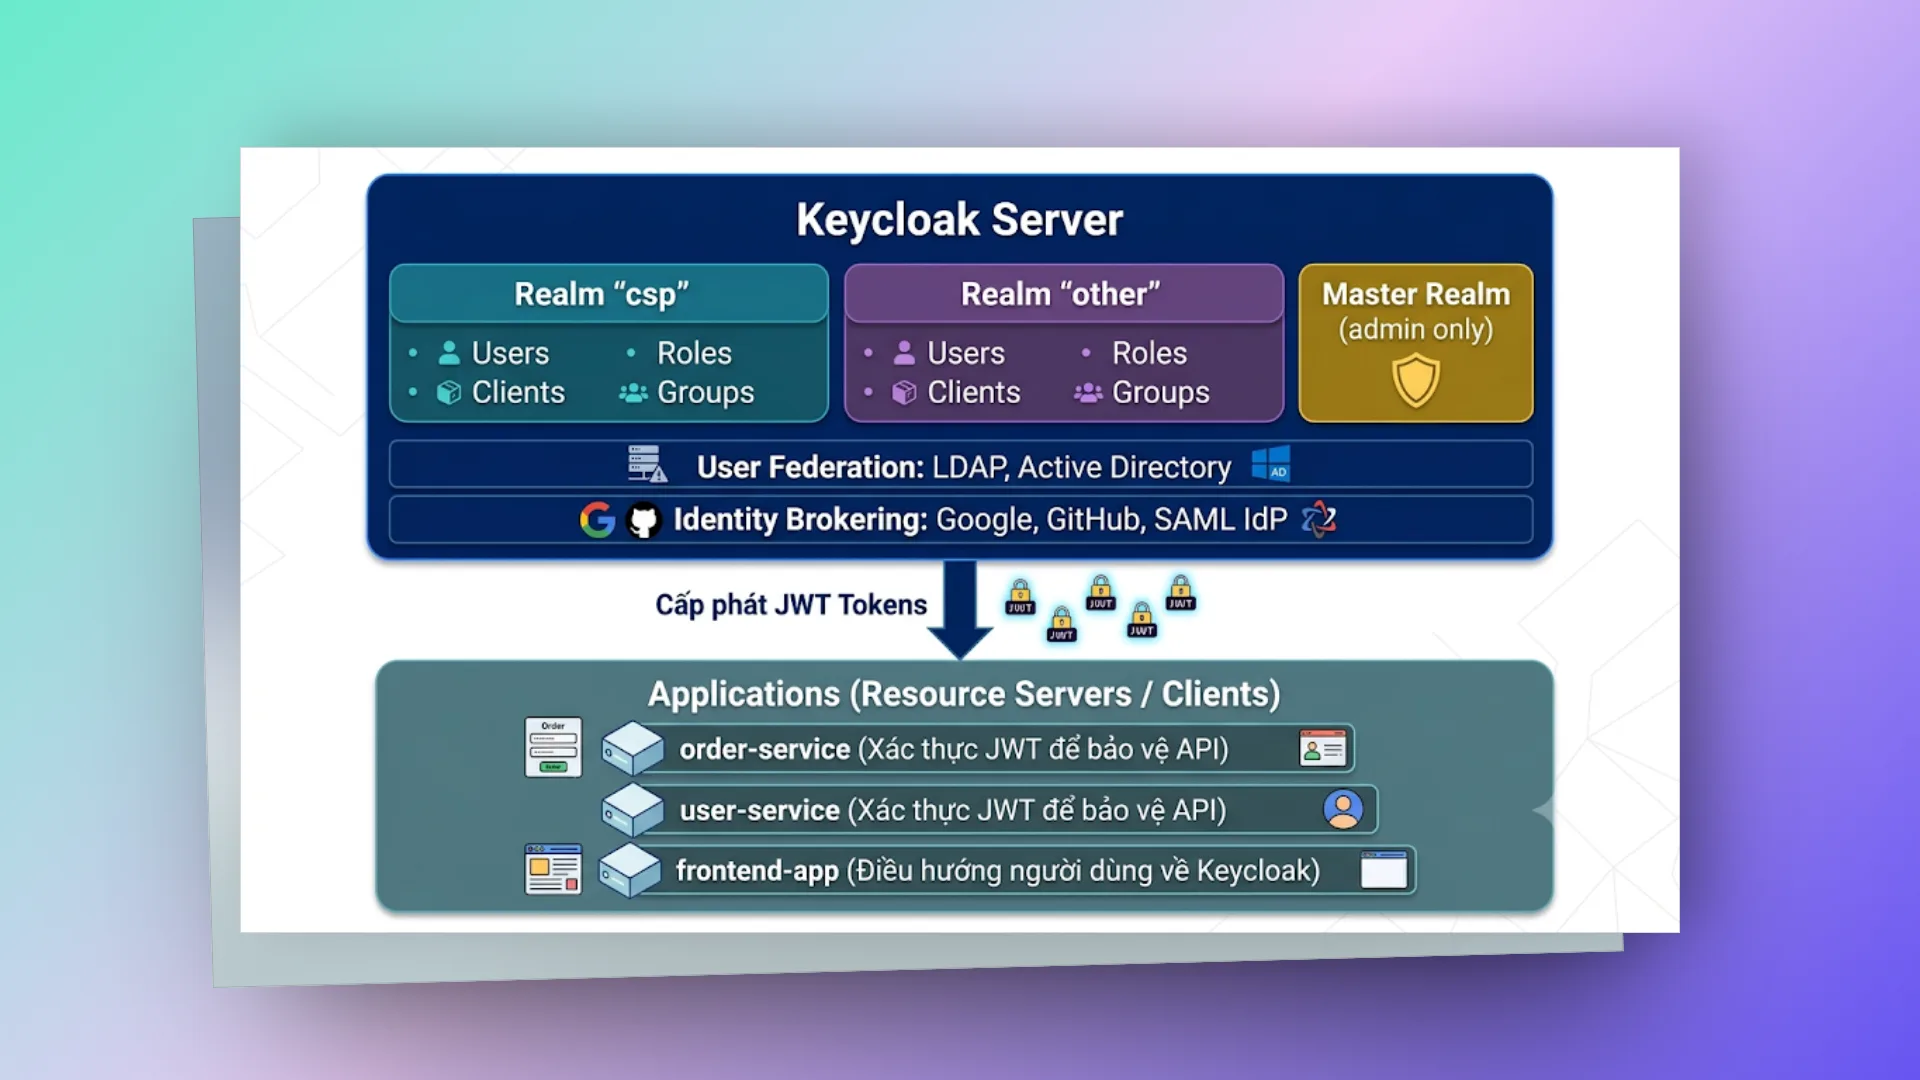
Để mỗi service tự lo xác thực (Authentication) và phân quyền (Authorization) thì cũng giống như mỗi căn nhà trong thành phố tự xây một nhà máy điện riêng: cồng kềnh, rủi ro, và đi ngược nguyên tắc tối giản (Danshari) khi thiết kế hệ thống.
Muốn giữ Business Logic "sạch" (Clean Architecture) và tập trung vào nghiệp vụ, nên giao hết phần bảo mật cho một hệ thống Quản lý Định danh và Truy cập (IAM) riêng. Trong thế giới mã nguồn mở, Keycloak là lựa chọn quen thuộc nhất.
Phần dưới gồm kiến trúc của Keycloak, các luồng xác thực hay dùng, vòng đời token và cách nối Keycloak vào Spring Boot.
# bản chất
Keycloak là một giải pháp Identity and Access Management (IAM) đầy đủ. Nó hỗ trợ các giao thức chuẩn như OpenID Connect (OIDC), OAuth 2.0 và SAML 2.0, và lo giúp bạn:
- Đăng nhập một lần (Single Sign-On - SSO).
- Đồng bộ người dùng (User Federation qua LDAP, Active Directory).
- Môi giới định danh (Identity Brokering với Google, GitHub, Facebook...).
Mục tiêu chính: ứng dụng của bạn không cần, và không nên, lưu mật khẩu hay tự viết logic mã hóa bảo mật.
Kiến trúc
Hệ thống phân tán cần ranh giới rõ ràng. Keycloak tổ chức dữ liệu theo kiểu đa tenant (Multi-tenancy), mỗi thành phần có phạm vi riêng.
# core concepts
Làm việc với Keycloak thì cần nắm các khái niệm sau:
| Concept | Mô tả |
|---|---|
| Realm | Môi trường biệt lập (Tenant). Một Realm chứa toàn bộ người dùng, ứng dụng, và các quy tắc bảo mật riêng. Realm master chỉ dành riêng cho việc quản trị hệ thống Keycloak. |
| Client | Bất kỳ thực thể nào (Frontend SPA, Mobile App, Backend Service) muốn giao tiếp và yêu cầu xác thực từ Keycloak. |
| User | Thực thể con người (End-user) thao tác trên hệ thống. |
| Role | Quyền hạn được gán. Có thể gán ở mức toàn cục (Realm Role) hoặc giới hạn trong một ứng dụng cụ thể (Client Role). |
| Group | Tập hợp các Users. Thay vì gán Role cho từng User (dễ sai sót), ta gán Role cho Group, User sẽ kế thừa các quyền này một cách có tổ chức. |
| Scope | Phạm vi quyền hạn mà Client yêu cầu Keycloak cấp phép. |
| Token | Chuỗi do Keycloak cấp sau khi xác thực, gồm Access Token, Refresh Token và ID Token (Access Token và ID Token là JWT). |
| Session | User login session (SSO) |
# oauth 2.0 / oidc flows
Quan trọng là chọn đúng luồng (flow) cho đúng đối tượng.
# authorization code flow (frontend apps)
Đây là luồng chuẩn cho các ứng dụng có giao diện (SPA, Mobile). Việc nhập và xác thực mật khẩu diễn ra hoàn toàn bên phía Keycloak, ứng dụng không bao giờ thấy mật khẩu.
SPA và app mobile là public client: code chạy trên máy người dùng nên không giữ được client_secret. Vì vậy luồng này phải đi kèm PKCE (Proof Key for Code Exchange). Frontend tự sinh một chuỗi ngẫu nhiên code_verifier, gửi bản băm của nó (code_challenge) lúc redirect, rồi gửi chính code_verifier lúc đổi code lấy token. Kẻ nào chặn được authorization code trên đường redirect cũng không đổi được token vì không có code_verifier. Khuyến nghị bảo mật OAuth hiện hành (RFC 9700) yêu cầu PKCE cho public client và khuyên bỏ hẳn Implicit Flow.
1. User → Frontend: Click "Login"
2. Frontend → Keycloak: Redirect to /realms/csp/protocol/openid-connect/auth
   (client_id, redirect_uri, code_challenge, code_challenge_method=S256)
3. Keycloak → User: Show login page
4. User → Keycloak: Enter credentials
5. Keycloak → Frontend: Redirect back with authorization code
6. Frontend → Keycloak: Exchange code + code_verifier for tokens (POST /token)
7. Keycloak → Frontend: Return access_token + refresh_token + id_token
8. Frontend → Backend: API call with Bearer access_token
9. Backend: Validate JWT (signature, expiry, issuer, roles)
# client credentials flow (service-to-service)
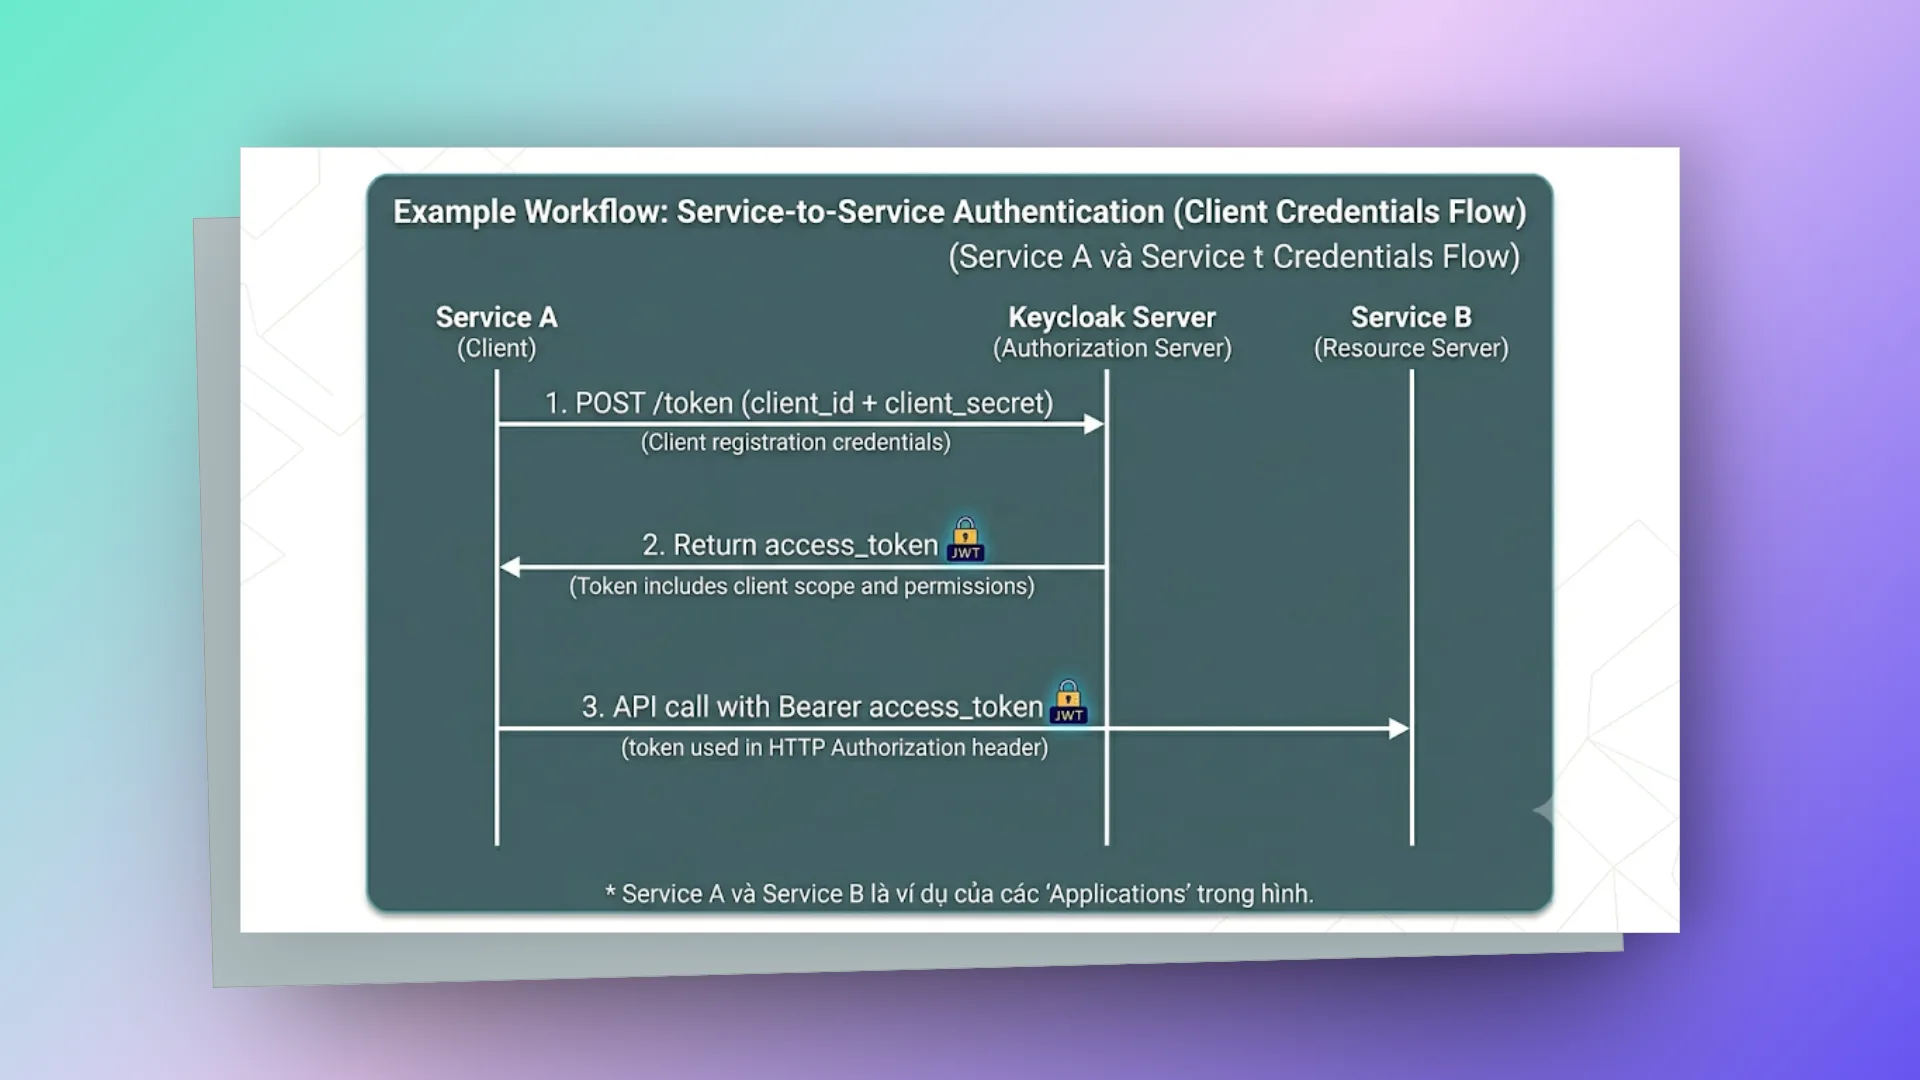
Khi các microservices gọi nhau thì không có người dùng ở giữa, mỗi service dùng "căn cước" riêng của mình.
# jwt token structure
Access Token thực chất là một chuỗi JSON Web Token (JWT). Ví dụ payload dưới có chú thích nên không phải JSON hợp lệ, chỉ để đọc. Hiểu cấu trúc payload thì mới thiết kế được cơ chế phân quyền chi tiết (fine-grained authorization).
{
  "exp": 1705312800,
  "iat": 1705312500,
  "iss": "http://keycloak:8080/realms/csp", // Nguồn cội cấp phát
  "sub": "user-uuid-123", // Định danh duy nhất của User
  "typ": "Bearer",
  "azp": "csp-frontend", // Client nào đã xin token này
  "preferred_username": "john.doe",
  "email": "john@example.com",

  // Quyền hạn cấp toàn hệ thống (Realm)
  "realm_access": {
    "roles": ["user", "admin"]
  },

  // Quyền hạn cấp riêng biệt cho từng Client (Resource)
  "resource_access": {
    "order-service": {
      "roles": ["order_read", "order_write"]
    }
  }
}
Lưu ý về Vòng đời Token:
- Access Token: tuổi thọ nên rất ngắn (5-15 phút) để giảm rủi ro khi bị lộ. Nó là Stateless nên không thu hồi giữa chừng được (trừ khi dùng Token Introspection, nhưng làm vậy là mất lợi thế về hiệu năng).
- Refresh Token: sống lâu hơn (vài giờ). Dùng để đổi Access Token mới khi cái cũ hết hạn. Thu hồi (Revocable) được thông qua quản lý Session trên Keycloak.
- ID Token: chỉ dùng cho Frontend để đọc thông tin hiển thị (tên, avatar), không dùng để xác thực các lời gọi API.
# spring boot integration (resource server)
Trong Clean Architecture, Security nằm ở lớp Infrastructure (tầng ngoài cùng). Nó chặn các request trái phép trước khi tới các lớp bên trong (Application, Domain) mà không lẫn vào business logic.
# config
Spring Boot tự cấu hình các filter cần thiết dựa trên địa chỉ (issuer-uri) của Keycloak. Ngoài chữ ký và hạn dùng, nó còn kiểm tra claim iss trong token phải khớp đúng từng ký tự với issuer-uri.
spring:
  security:
    oauth2:
      resourceserver:
        jwt:
          # Spring Boot sẽ gọi đến điểm well-known (.well-known/openid-configuration)
          # để tự động lấy Public Keys (JWKS) dùng cho việc xác thực chữ ký token.
          issuer-uri: http://keycloak:8080/realms/csp
Đây là chỗ hay vấp khi chạy Docker Compose: trình duyệt đăng nhập qua http://localhost:8080 nên token có iss là http://localhost:8080/realms/csp, còn backend lại cấu hình http://keycloak:8080/... nên mọi request đều bị 401. Cách sửa là cố định hostname công khai của Keycloak (option hostname, biến môi trường KC_HOSTNAME) để iss luôn giống nhau, rồi cho backend dùng đúng địa chỉ đó. Nếu backend không gọi tới được địa chỉ công khai thì có thể khai báo thêm jwk-set-uri trỏ vào địa chỉ nội bộ để tải public key.
# security config
Payload của Keycloak có realm_access và resource_access lồng nhau, nên cần một Converter tùy chỉnh để Spring Security map chúng thành GrantedAuthority. Mặc định Spring chỉ đọc claim scope và tạo authority dạng SCOPE_xxx; thay converter như dưới thì mấy authority SCOPE_ đó cũng mất, nếu còn dùng hasAuthority("SCOPE_...") thì phải gộp thêm JwtGrantedAuthoritiesConverter mặc định vào.
@Configuration
@EnableWebSecurity
@EnableMethodSecurity
public class SecurityConfig {

    @Bean
    public SecurityFilterChain filterChain(HttpSecurity http) throws Exception {
        http
            .csrf(csrf -> csrf.disable()) // Stateless APIs không cần CSRF
            .sessionManagement(s -> s.sessionCreationPolicy(SessionCreationPolicy.STATELESS))
            .authorizeHttpRequests(auth -> auth
                .requestMatchers("/actuator/health").permitAll()
                .requestMatchers("/api/admin/**").hasRole("ADMIN")
                .requestMatchers("/api/**").authenticated()
            )
            .oauth2ResourceServer(oauth2 -> oauth2
                .jwt(jwt -> jwt.jwtAuthenticationConverter(keycloakJwtConverter()))
            );
        return http.build();
    }

    private JwtAuthenticationConverter keycloakJwtConverter() {
        JwtAuthenticationConverter converter = new JwtAuthenticationConverter();
        converter.setJwtGrantedAuthoritiesConverter(jwt -> {
            List<GrantedAuthority> authorities = new ArrayList<>();

            // 1. Phân tách các Realm Roles
            Map<String, Object> realmAccess = jwt.getClaimAsMap("realm_access");
            if (realmAccess != null) {
                List<String> roles = (List<String>) realmAccess.get("roles");
                roles.forEach(role ->
                    authorities.add(new SimpleGrantedAuthority("ROLE_" + role.toUpperCase())));
            }

            // 2. Phân tách các Client Roles (Tùy chọn cho độ mịn cao hơn)
            Map<String, Object> resourceAccess = jwt.getClaimAsMap("resource_access");
            if (resourceAccess != null) {
                Map<String, Object> clientAccess = (Map<String, Object>) resourceAccess.get("order-service");
                if (clientAccess != null) {
                    List<String> clientRoles = (List<String>) clientAccess.get("roles");
                    clientRoles.forEach(role ->
                        authorities.add(new SimpleGrantedAuthority(role)));
                }
            }

            return authorities;
        });
        return converter;
    }
}
# keycloak admin client (java)
Nhiều dự án không chỉ quản lý User qua Admin Console mà cần tự động hóa (ví dụ tạo tài khoản ngay khi user đăng ký trên ứng dụng của bạn). Keycloak có thư viện để làm việc này bằng code.
@Service
public class KeycloakAdminService {

   private final Keycloak keycloak;

   public KeycloakAdminService(@Value("${keycloak.admin.url}") String url,
                                @Value("${keycloak.admin.realm}") String realm,
                                @Value("${keycloak.admin.client-id}") String clientId,
                                @Value("${keycloak.admin.client-secret}") String secret) {
       this.keycloak = KeycloakBuilder.builder()
           .serverUrl(url)
           .realm(realm)
           .clientId(clientId)
           .clientSecret(secret)
           .grantType(OAuth2Constants.CLIENT_CREDENTIALS)
           .build();
   }

   // Create user
   public String createUser(String realm, String username, String email, String password) {
       UserRepresentation user = new UserRepresentation();
       user.setUsername(username);
       user.setEmail(email);
       user.setEnabled(true);
       user.setEmailVerified(true);

       CredentialRepresentation credential = new CredentialRepresentation();
       credential.setType(CredentialRepresentation.PASSWORD);
       credential.setValue(password);
       credential.setTemporary(false);
       user.setCredentials(List.of(credential));

       // Response giữ HTTP connection, phải đóng sau khi dùng
       try (Response response = keycloak.realm(realm).users().create(user)) {
           // getCreatedId ném WebApplicationException nếu status khác 201 (vd 409 trùng username/email)
           return CreatedResponseUtil.getCreatedId(response);
       }
   }

   // Assign role to user
   public void assignRole(String realm, String userId, String roleName) {
       RoleRepresentation role = keycloak.realm(realm).roles().get(roleName).toRepresentation();
       keycloak.realm(realm).users().get(userId).roles().realmLevel()
           .add(List.of(role));
   }

   // Get user by email
   public UserRepresentation getUserByEmail(String realm, String email) {
       List<UserRepresentation> users = keycloak.realm(realm).users()
           .searchByEmail(email, true);
       return users.isEmpty() ? null : users.get(0);
   }

   // Disable user
   public void disableUser(String realm, String userId) {
       UserRepresentation user = keycloak.realm(realm).users().get(userId).toRepresentation();
       user.setEnabled(false);
       keycloak.realm(realm).users().get(userId).update(user);
   }
}
Client dùng cho admin client (ở đây là client credentials) cần bật Service Account và được gán các role của client realm-management như manage-users, view-users, view-realm. Chỉ gán đúng quyền cần dùng, đừng gán realm-admin cho tiện.
# realm configuration
# client setup (for backend service)
{
  "clientId": "order-service",
  "protocol": "openid-connect",
  "publicClient": false,
  "serviceAccountsEnabled": true,
  "authorizationServicesEnabled": false,
  "directAccessGrantsEnabled": false,
  "standardFlowEnabled": false,
  "clientAuthenticatorType": "client-secret"
}
# client setup (for frontend spa)
{
  "clientId": "csp-frontend",
  "protocol": "openid-connect",
  "publicClient": true,
  "standardFlowEnabled": true,
  "directAccessGrantsEnabled": false,
  "redirectUris": ["http://localhost:3000/*", "https://app.example.com/*"],
  "webOrigins": ["http://localhost:3000", "https://app.example.com"],
  "attributes": {
    "pkce.code.challenge.method": "S256"
  }
}
pkce.code.challenge.method bắt Keycloak từ chối mọi yêu cầu đăng nhập không kèm PKCE. Ở production, redirectUris nên ghi càng cụ thể càng tốt; wildcard rộng như /* dễ bị lợi dụng để chuyển code về một trang không mong muốn.
# token lifecycle
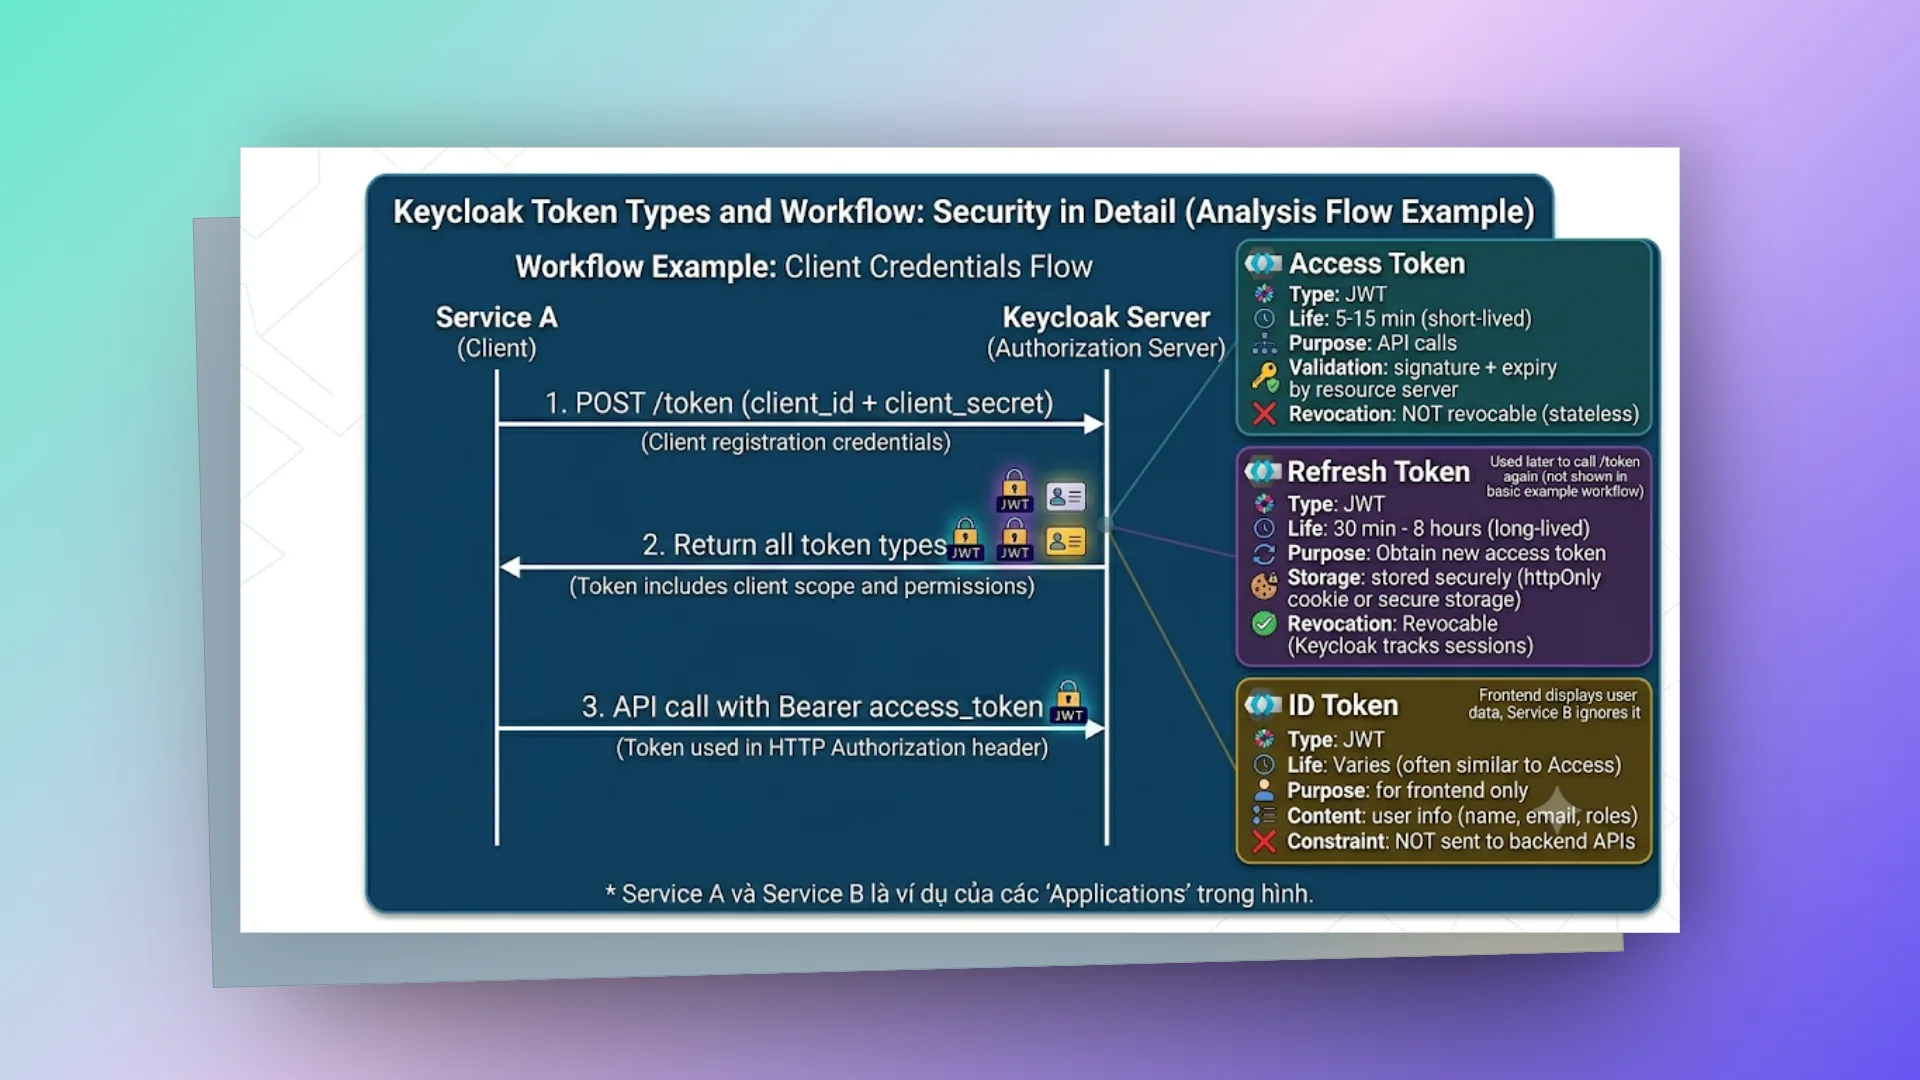
Access Token (short-lived: 5-15 min)
 → Used for API calls
 → Validated by resource server (signature + expiry)
 → NOT revocable (stateless)

Refresh Token (long-lived: 30 min - 8 hours)
 → Used to get new access token
 → Stored securely (httpOnly cookie or secure storage)
 → Revocable (Keycloak tracks sessions)

ID Token (for frontend)
 → Contains user info (name, email...)
 → Used by frontend to display user data
 → NOT sent to backend APIs
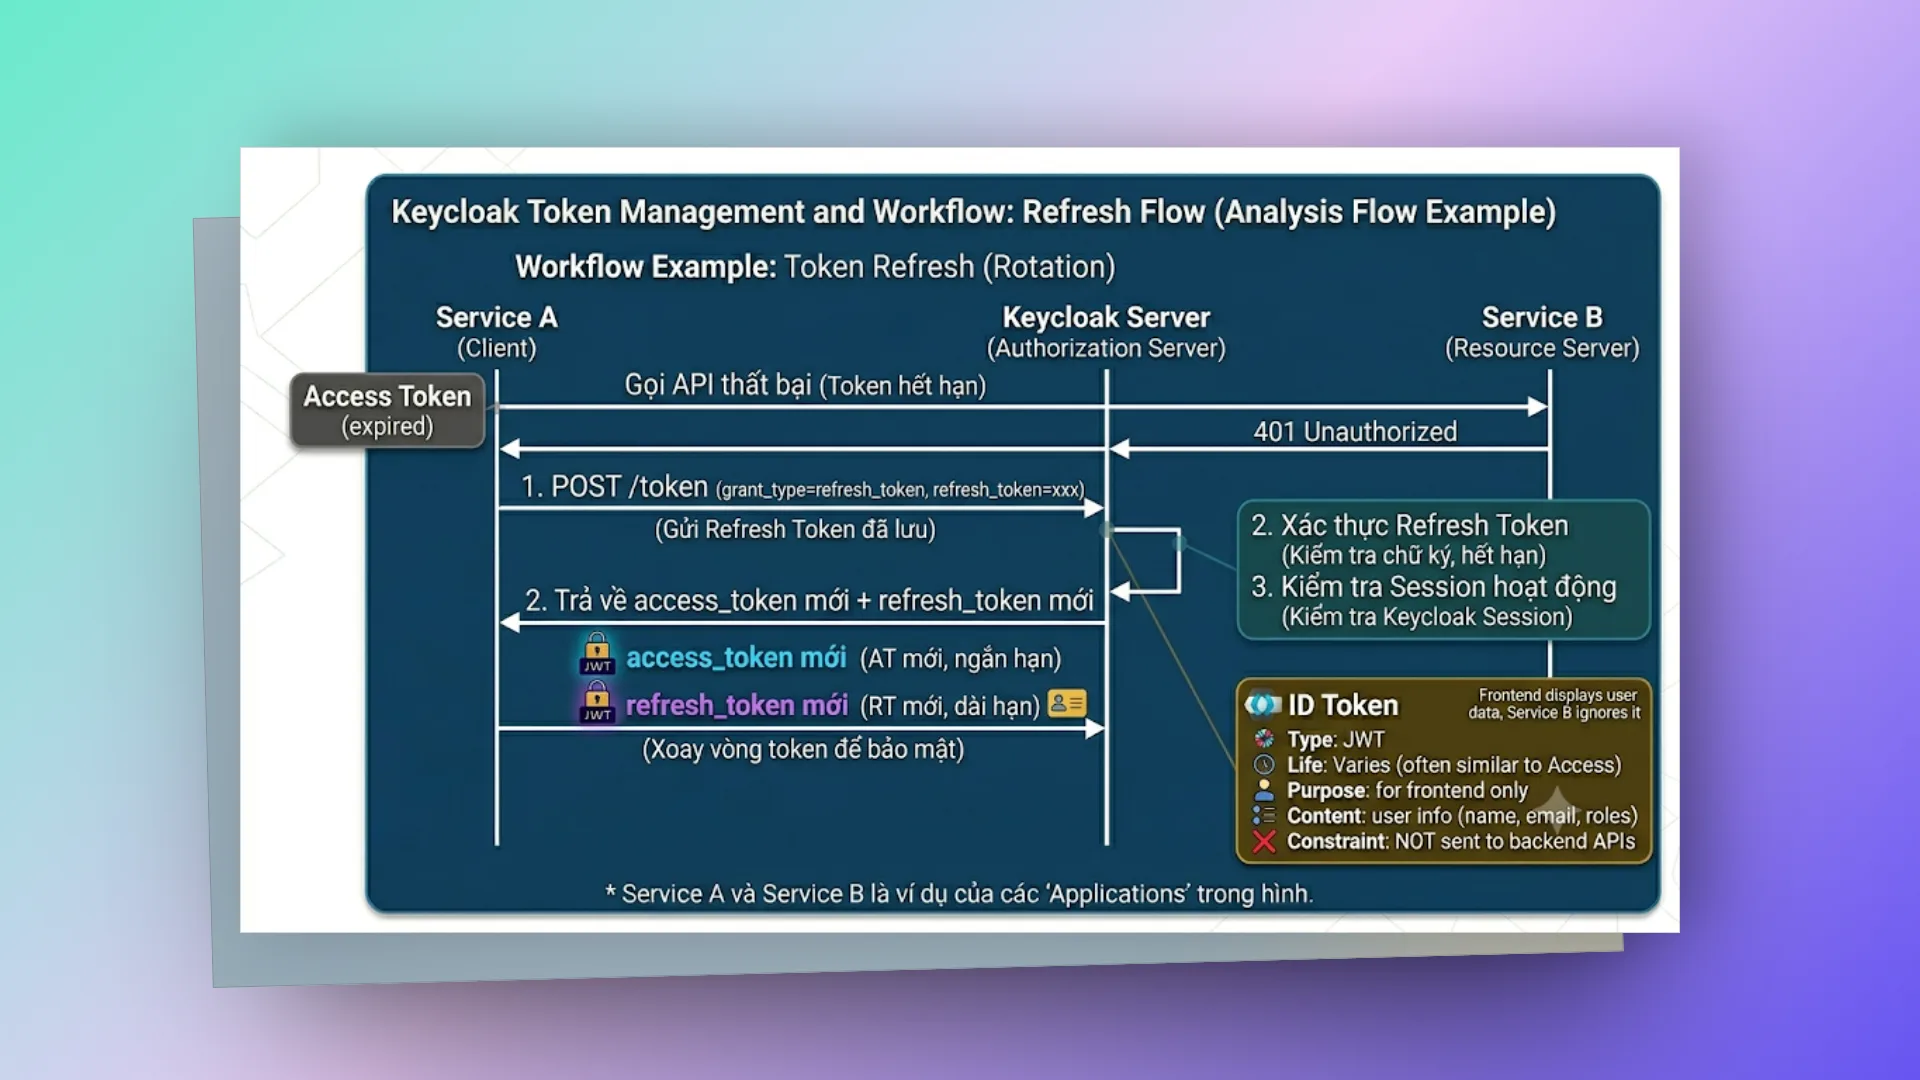
# token refresh flow
# service-to-service authentication
Cách gọn nhất là để Spring Security OAuth2 Client lo việc xin token. Khai báo client trong application.yml (cần spring-boot-starter-oauth2-client, và spring-boot-starter-webflux để có WebClient):
spring:
  security:
    oauth2:
      client:
        registration:
          service-b:
            provider: keycloak
            client-id: order-service
            client-secret: ${ORDER_SERVICE_SECRET}
            authorization-grant-type: client_credentials
        provider:
          keycloak:
            issuer-uri: http://keycloak:8080/realms/csp
Rồi gắn filter OAuth2 vào WebClient:
@Configuration
public class OAuth2ClientConfig {

   // Manager chạy được cả ngoài HTTP request (scheduled job, consumer...)
   @Bean
   public OAuth2AuthorizedClientManager authorizedClientManager(
           ClientRegistrationRepository registrations,
           OAuth2AuthorizedClientService clientService) {
       var manager = new AuthorizedClientServiceOAuth2AuthorizedClientManager(registrations, clientService);
       manager.setAuthorizedClientProvider(
           OAuth2AuthorizedClientProviderBuilder.builder().clientCredentials().build());
       return manager;
   }

   @Bean
   public WebClient webClient(OAuth2AuthorizedClientManager manager) {
       var oauth2 = new ServletOAuth2AuthorizedClientExchangeFilterFunction(manager);
       return WebClient.builder()
           .apply(oauth2.oauth2Configuration())
           .build();
   }
}
// Service A calls Service B using client credentials
// import static ...ServletOAuth2AuthorizedClientExchangeFilterFunction.clientRegistrationId;
@Service
public class ServiceBClient {
private final WebClient webClient;
public ServiceBClient(WebClient webClient) {
this.webClient = webClient;
}
public Object callServiceB() {
// Filter tự lấy token bằng client credentials, cache lại và chỉ xin token mới khi sắp hết hạn
return webClient.get()
.uri("http://service-b/api/data")
.attributes(clientRegistrationId("service-b"))
.retrieve()
.bodyToMono(Object.class)
.block();
}
}Khai báo issuer-uri ở phần provider thì Spring Boot gọi discovery của Keycloak ngay lúc khởi động, Keycloak chưa lên là service cũng không start được. Muốn tránh thì khai báo thẳng token-uri thay cho issuer-uri. Từ Spring Security 6.4 cũng có OAuth2ClientHttpRequestInterceptor để dùng với RestClient nếu bạn không muốn kéo WebFlux vào.
Hoặc manual token fetch:
record TokenResponse(@JsonProperty("access_token") String accessToken,
                     @JsonProperty("expires_in") long expiresIn) {}

public String getServiceToken() {
   MultiValueMap<String, String> params = new LinkedMultiValueMap<>();
   params.add("grant_type", "client_credentials");
   params.add("client_id", clientId);
   params.add("client_secret", clientSecret);

   // MultiValueMap được gửi dạng application/x-www-form-urlencoded, đúng định dạng token endpoint yêu cầu
   TokenResponse response = restTemplate.postForObject(
       keycloakUrl + "/realms/csp/protocol/openid-connect/token",
       params, TokenResponse.class);

   return response.accessToken();
}
Viết tay thì nhớ cache token và chỉ xin lại khi gần hết expires_in. Mỗi lần gọi service B lại xin một token mới thì Keycloak phải gánh thêm đúng bằng lưu lượng gọi giữa các service.
Event Listeners
Giám sát (Observability) là bắt buộc: cần biết ai đang đăng nhập, ai đang brute-force. Custom EventListenerProvider cho phép đẩy các sự kiện này vào hệ thống Log tập trung hoặc Kafka để phân tích.
public class CustomEventListener implements EventListenerProvider {

    private static final Logger log = Logger.getLogger(CustomEventListener.class); // org.jboss.logging

    @Override
    public void onEvent(Event event) {
        if (event.getType() == EventType.LOGIN) {
            log.infof("Xác thực thành công | userId=%s | ip=%s",
                event.getUserId(), event.getIpAddress());
        }
        if (event.getType() == EventType.LOGIN_ERROR) {
            log.warnf("Cảnh báo bất thường: Thất bại xác thực | userId=%s | error=%s",
                event.getUserId(), event.getError());
            // Có thể emit event ra Kafka để hệ thống Fraud Detection xử lý
        }
    }

    @Override
    public void onEvent(AdminEvent event, boolean includeRepresentation) {
        // Lắng nghe các thay đổi về cấu hình từ Admin
    }

    @Override
    public void close() {
        // Bắt buộc theo interface Provider; giải phóng tài nguyên nếu có
    }
}
Provider này chưa tự chạy được. Keycloak tạo nó qua một EventListenerProviderFactory:
public class CustomEventListenerFactory implements EventListenerProviderFactory {

    @Override
    public EventListenerProvider create(KeycloakSession session) {
        return new CustomEventListener();
    }

    @Override
    public String getId() {
        return "custom-event-listener"; // tên hiện trong Realm settings > Events
    }

    @Override public void init(Config.Scope config) {}
    @Override public void postInit(KeycloakSessionFactory factory) {}
    @Override public void close() {}
}
Sau đó khai báo tên class factory trong file META-INF/services/org.keycloak.events.EventListenerProviderFactory, đóng gói thành JAR, bỏ vào thư mục providers/ của Keycloak, chạy kc.sh build, rồi vào Realm settings > Events thêm custom-event-listener vào danh sách listener. Lưu ý onEvent chạy đồng bộ trong luồng đăng nhập: gửi Kafka hay gọi HTTP chậm ở đây là người dùng đăng nhập chậm theo, nên đẩy sang hàng đợi hoặc gửi bất đồng bộ.
# production checklist
Trước khi đưa Keycloak lên Production, soát lại các mục sau:
- Tách biệt (Isolation): mỗi tenant một Realm riêng; còn các môi trường dev/staging/prod thì nên tách hẳn thành các instance Keycloak riêng, không chỉ khác Realm.
- Token sống ngắn: Access Token (5-15 phút) kết hợp Refresh Token Rotation (trong Keycloak là tuỳ chọn Revoke Refresh Token ở Realm settings > Tokens).
- Phòng thủ: bật Brute Force Detection để tự khóa tài khoản khi phát hiện tấn công.
- Hạ tầng: chạy bằng
kc.sh start(không phảistart-dev), dùng Database thật (PostgreSQL/MySQL), không dùng H2 cho Production. - Sẵn sàng cao (HA): cấu hình Clustering với cache phân tán Infinispan.
- Kết nối: bắt buộc HTTPS (Terminate TLS tại Load Balancer/Nginx). Chặn IP từ mạng Public vào Admin Console.
- Rủi ro: lên lịch rotate Token Signing Keys định kỳ và cấu hình tự động export/backup Realm.
- Giao diện: dùng Custom Themes để trang Login khớp với thương hiệu của dự án.
Mới bắt đầu thì cứ dựng Keycloak bằng Docker, tạo một realm, một client SPA có PKCE và một client backend dùng client credentials, rồi nối Spring Boot vào như trên. Checklist này để dành cho lúc chuẩn bị lên production.
Chỉ là những ghi chép cá nhân với hy vọng mang lại chút giá trị. Nếu thấy hữu ích, đừng ngại chia sẻ cho bạn bè & đồng nghiệp nhé!
Happy coding 😎 👍🏻 🚀 🔥.